How to Install Solar Photovoltaic Panels
Introduction
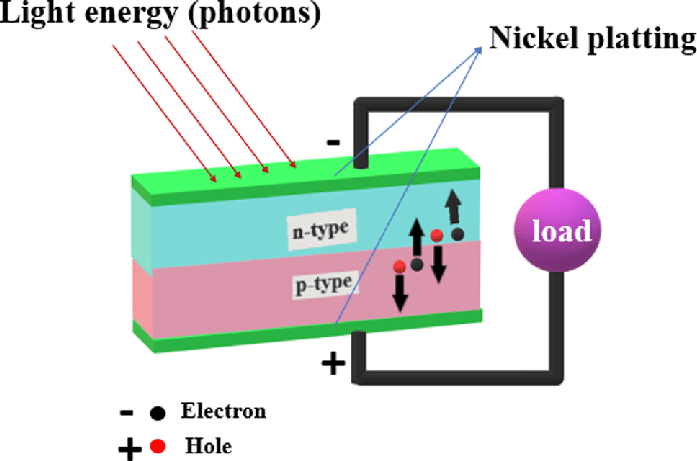
So, you’ve made the decision to invest in solar photovoltaic panels for your home or business. Congratulations on taking a step towards sustainable and clean energy! Installing solar panels requires careful planning and skilled execution to ensure they are working efficiently. In this guide, we will walk you through the process of installing solar photovoltaic panels.
Prepare the Site
Before installation, it’s essential to assess the site and ensure it is suitable for solar panel installation. The location should have minimal shading, ample sunlight exposure, and a sturdy roof or ground space to mount the panels. Inspect the roof or ground for any damage or rot that may affect the installation.
Step 1: Site Assessment
Conduct a thorough assessment of the site to determine its solar potential. This involves analyzing the angle and orientation of the area, as well as shading from nearby structures or trees. Use a solar pathfinder or SunEye tool to assess shading and optimize panel placement.
Step 2: Roof or Ground Preparation
Prepare the roof or ground by ensuring it is structurally sound and can support the weight of the solar panels. If needed, make repairs or reinforcements to the mounting surface. Clear any debris or obstacles that may obstruct the installation process.
Install the Solar Panels
Once the site is ready, it’s time to install the solar photovoltaic panels. This process requires precision and careful handling to ensure the panels are securely mounted and connected for optimal performance.
Step 3: Mounting the Panels
Carefully position and mount the solar panels on the roof or ground. Ensure that they are securely fastened and properly aligned to maximize sunlight exposure. Use flashing and sealants to protect against water leaks and secure the panels in place.
Step 4: Electrical Wiring
Connect the solar panels with electrical wiring and ensure proper grounding and insulation. This step requires electrical knowledge and compliance with local building codes. Consider hiring a professional electrician to assist with the wiring to ensure safety and code compliance.
Commission the System
After the panels are installed and wired, the system needs to be commissioned to ensure it is functioning properly and efficiently generating electricity.
Step 5: System Testing
Conduct thorough testing of the solar photovoltaic system to verify that it is producing electricity as intended. This involves checking the output of each panel and the overall system performance. Address any issues or discrepancies during this testing phase.
Step 6: Final Inspection
Once the system is tested, schedule a final inspection with local authorities or a certified inspector to ensure the installation meets all safety and regulatory requirements. This step is crucial for ensuring the system is compliant and eligible for any incentives or rebates.
Conclusion
Installing solar photovoltaic panels is a rewarding investment that can lead to long-term energy savings and environmental benefits. By following these steps and seeking professional assistance when needed, you can ensure a successful installation and enjoy the benefits of clean, renewable energy for years to come.

